Introduction - How to Use This Handbook#
This is a handbook that teaches through code. It does not replace a textbook. Instead, it arranges the information-hiding and machine-learning ideas behind F:\Steganography in an order a beginner can actually follow: intuition and examples first, then the project implementation, then hands-on experiments.
0.1 Who This Is For#
Assumed starting point - the handbook fills every other gap for you:
Comfort with a Windows PC and installing software;
Some college math exposure, or willingness to skip a formula and return later;
A little programming is helpful but not required - Chapter 2 brings Python up to working level;
At least 12 weeks of 6-8 hours per week; for a deep 6-12 month track, see Appendix F.
Tip | If you have never installed Python, do not worry: the first two weeks are designed exactly for that situation. The goal is not to become a programmer but to become someone who can read and modify this project.
0.2 Reading Conventions#
Marker |
Meaning |
|---|---|
Tip |
Plain-language explanation or analogy that removes a common stumbling block |
Watch out |
A trap beginners frequently hit: types, mismatched parameters, misread statistics |
Try it |
A hands-on experiment you must run; reading alone does not count as learning |
Think about it |
An open question with no single right answer, used to test real understanding |
Read the code |
Open a specific file and map the concept onto the implementation |
0.3 The 12-Week Quick-Start Roadmap (full 6-12 month track in Appendix F)#
The route follows a natural order: carrier basics -> steganography -> steganalysis -> machine learning -> engineering -> capstone. Every week maps to runnable code or a reproducible experiment:
Week |
Topic |
Chapter |
Hands-on outcome |
|---|---|---|---|
1 |
Digital images and binary |
Ch. 1 |
Inspect pixels and bit planes yourself |
1 (supplement) |
JPEG and DCT coefficients |
Ch. 1½ |
Explain how the quantization table governs capacity |
2 |
Python / NumPy / Pillow |
Ch. 2 |
Run the GUI or run_e2e.py; read/write image arrays |
3-4 |
LSB hiding and blind steganalysis |
Ch. 3 |
Hide a message, then detect it with chi-square/RS |
5 |
Matrix embedding and F5 |
Ch. 4 |
Use Hamming codes to change less and hide more |
6 |
nsF5, wet paper, hash keying |
Ch. 5-6 |
Explain the wet-paper solver in ns5_core.py |
7 |
Machine-learning foundations |
Ch. 7 |
Explain features, labels, overfitting, AUC |
8-9 |
ML-based steganalysis |
Ch. 8 |
Run the v1 and v2 pipelines; explain SRM and dual models |
10 |
C++ / GPU / data engineering |
Ch. 9 |
Understand acceleration, self-checks, multi-source data |
11-12 |
Capstone and presentation |
Ch. 10-11 |
Complete and present a small improvement experiment |
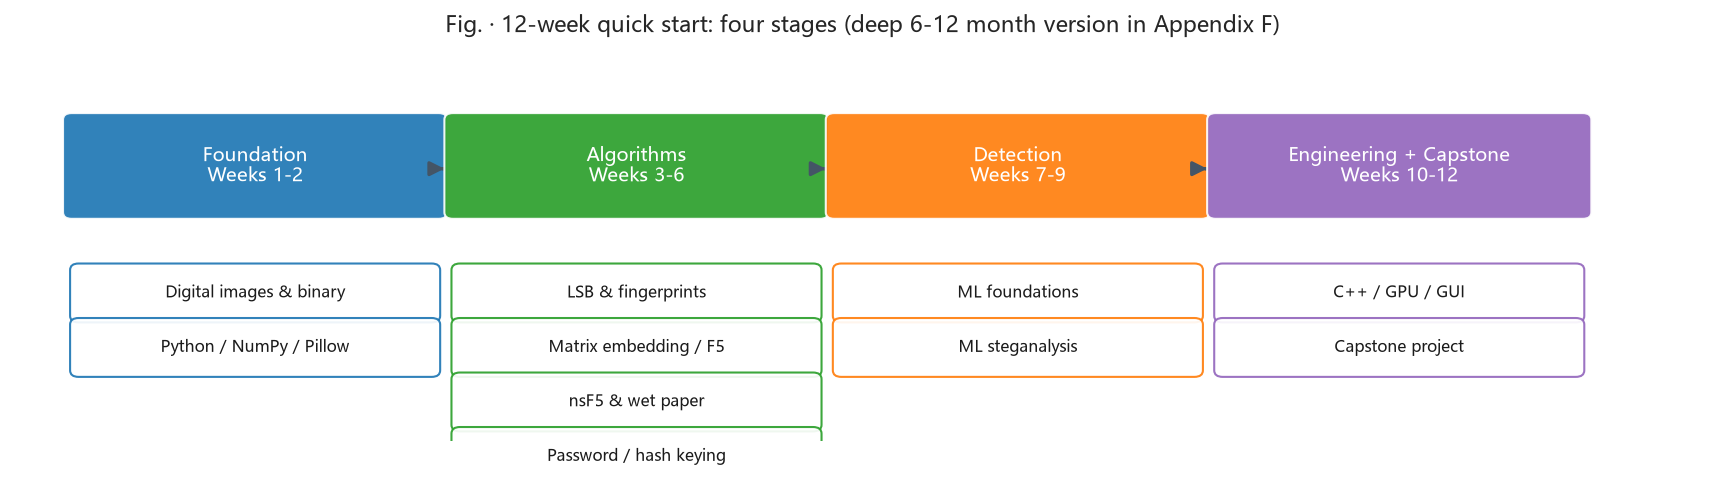
Try it | Copy this table into a weekly checklist (Appendix C has a ready-made one). Tick a row every weekend and answer that chapter’s “Think about it” question.
Want to go deeper and produce results? The above is the 12-week “get started” route; if you have 6-12 months, see Appendix F’s in-depth roadmap - the same content, but slowed and deepened over “Foundation / Intermediate / Advanced / Project” phases, with an optional “algorithm / detection / engineering / research” track.
0.4 What You Will Be Able to Do#
Explain steganography, steganalysis, embedding efficiency, shrinkage, wet paper coding, and syndromes in your own words;
Say why naive LSB hiding is exposed by chi-square and RS analysis;
Work one p=3 Hamming embedding example by hand (at most one coefficient changed per block);
Explain the real difference between F5 and nsF5, and why eliminating shrinkage matters;
Explain how image-hash keying gives decoder self-synchronization, and where its limits are;
Explain the full supervised-learning pipeline, including why photo-grouped cross-validation is essential;
Understand the v1 11-D features and the v2 143-D features, including SRM statistics and the 143d/53d dual-model strategy;
Explain what C++ DLLs and GPU code accelerate and why bit-level consistency checks matter;
Complete a small, honest improvement experiment and write up the results.
0.5 Project Map: Know the Code Before You Study It#
The project is a research tool: it runs algorithm experiments and ships as a GUI application. Remember these files first; every chapter returns to them:
File |
Role |
Chapter |
|---|---|---|
src/image_io.py |
Image I/O wrappers for 8-bit grayscale and color images |
Ch. 2 |
src/ns5_core.py |
Algorithm core: Hamming codes, wet paper, hash keying, embed/extract |
Ch. 3-6 |
src/steganalysis.py |
Blind steganalysis: chi-square, RS, combined verdict |
Ch. 3 |
src/efficiency.py |
Theoretical and measured code-family / efficiency curves |
Ch. 4 |
src/matrix_demo.py |
Teaching demo of syndrome lookup |
Ch. 4 |
src/fsfeatures.py + cpp/fsfeatures.dll |
ctypes binding for the v1 11-D features |
Ch. 8 |
src/featurize_v2.py + src/srm_filter.py |
v1.4: SRM preprocessing and the 143-D v2 feature set |
Ch. 8 |
src/make_dataset.py / train_model.py |
Dataset generation (v1/v2, SRM, multi-source) and training |
Ch. 8 |
src/ml_predict.py |
Single-image ML prediction (143d/53d dual models + sensitivity) |
Ch. 8 |
src/cppembed.py + cpp/nsf5embed.dll |
C++ embed/shuffle hot path and self-checks |
Ch. 9 |
gpu/*.py |
PyTorch batched features (v1 11-D / v2 143-D) and GPU training |
Ch. 9 |
src/gui.py |
Tkinter GUI with teaching panels |
Ch. 9 |
src/test_core.py and friends |
Regression tests for embedding, analysis, false positives |
All |
Read the code | Keep the project window open from now on. Whenever the handbook names a file, switch to it. From Chapter 2 onward most topics assume you run before you read.
0.6 Learning Tips#
Run first, understand later. End-to-end scripts remove most paper confusion;
Digest formulas twice. First pass: conclusion and intuition. Second pass: derivation;
Retell in your own words. If you can explain a chapter summary to a friend, you own it;
Keep an experiment log. Parameters and outputs are the most valuable material for your capstone;
Trust the tests. test_core.py and test_steg.py are the fastest judge of whether you broke something.
Think about it | Before you start, spend five minutes answering: what is the difference between encryption and steganography? If you cannot say, that is perfect - Chapter 3 starts there.
0.7 What Changed for v1.4.0 (2026-09-06)#
The first draft of this handbook tracked project v1.3. On September 6 the project moved to v1.4.0, and this edition is synchronized with it. Chapters 1-6 (the steganography algorithms) are unchanged; the machine-learning and engineering chapters now include sections 8.8 and 9.7, and older scores are labeled as “v1 baselines”.
ML detection grew from 11-D features with LR/XGB (AUC ~0.75-0.79) to a 143-D LightGBM default (8-split mean 0.8980) plus a 53-D interpretable model (0.8461): the 143-D model is the more accurate one, the 53-D one explains every dimension; see 8.8 and
docs/RESULTS.md;New SRM high-pass preprocessing, 143-D v2 features, 12 embedding variants, real JPEG clean samples, and a full BOSSbase multi-source dataset; see 8.8 and 9.7;
The repository moved to a new GitHub home (Yukinoshita-lin/nsf5-steganography) and the license is now Apache-2.0 with a NOTICE file;
The glossary, command sheet, weekly checklist, and concept-to-code map were extended for v1.4.