Chapter 9 - Engineering: C++, GPU, GUI, and Tests (Week 10)#
Try it | Goals: see how algorithms become software; understand why C++ and GPU acceleration exist and how cross-language consistency is guaranteed; run the tests and trace the CI.
9.1 Architecture: Layered, Not Coupled#
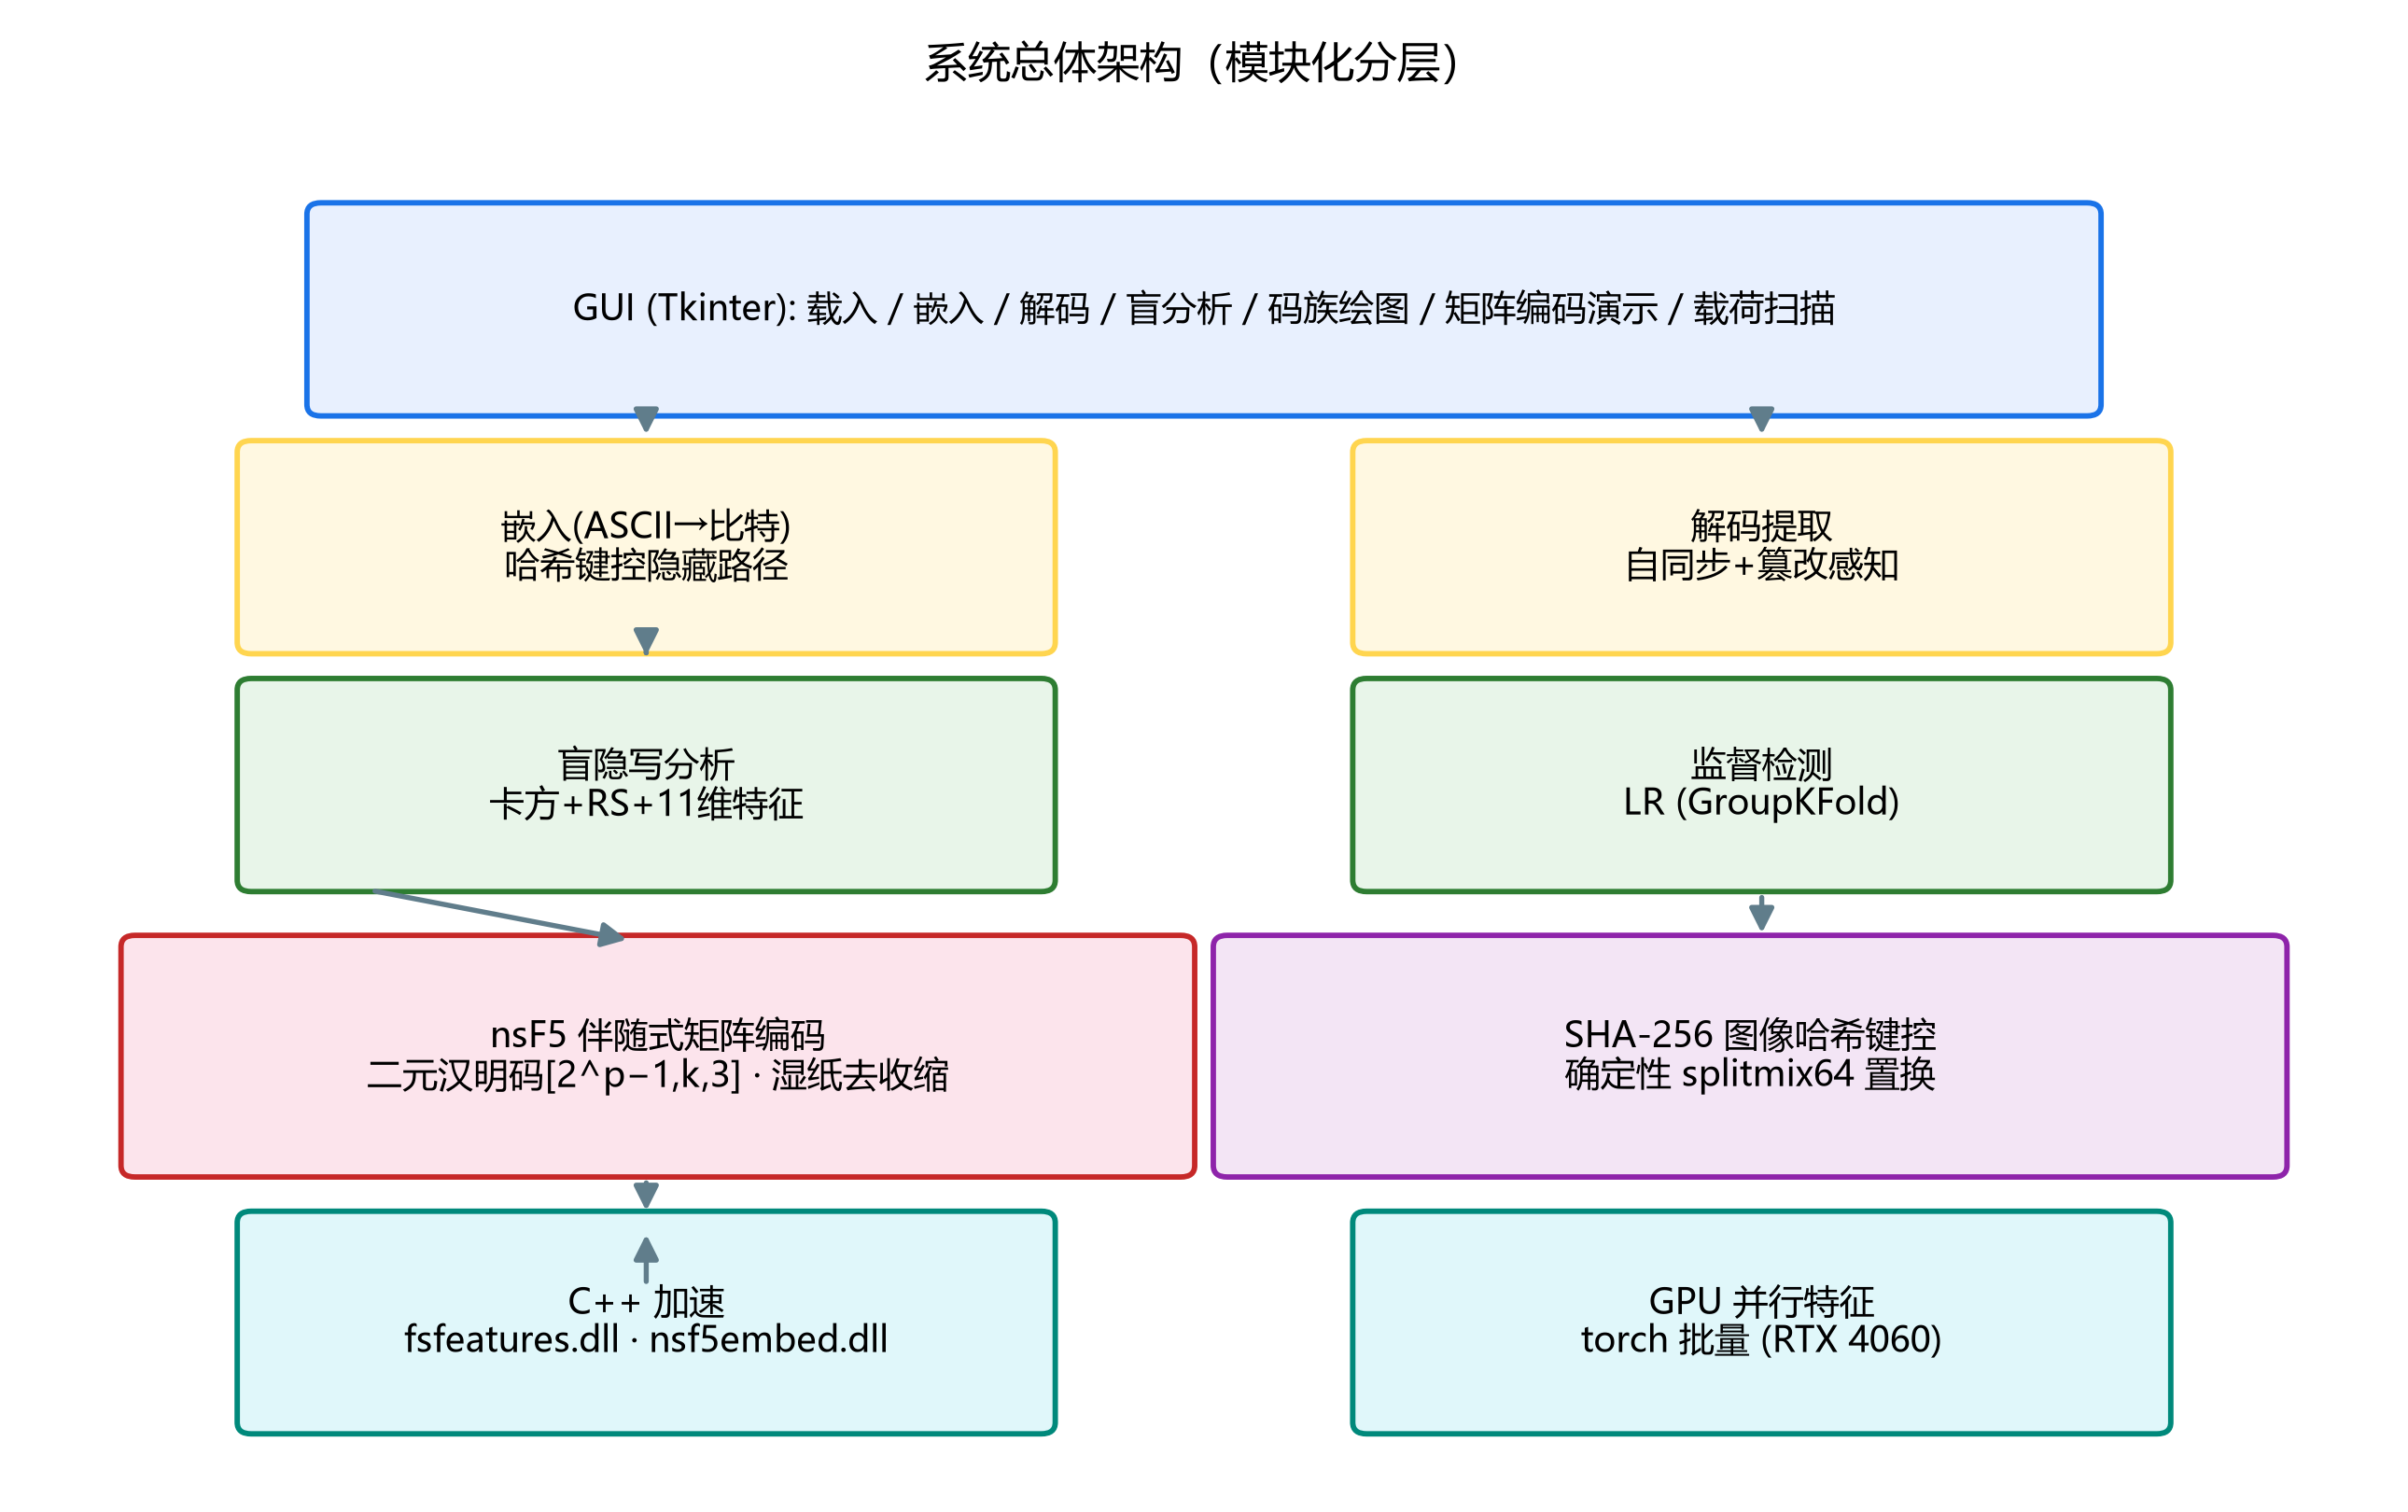
Fig. 9-1 System architecture: acceleration layer -> algorithm/security core -> features -> GUI (project figure)
Acceleration layer: cpp/fsfeatures.dll (features), cpp/nsf5embed.dll (embedding/shuffling);
Algorithm core: ns5_core.py - Hamming codes, wet paper, hash keying, embed/extract;
Feature layer: steganalysis.py, efficiency.py, make_dataset.py, train_model.py, ml_predict.py, featurize_v2.py, srm_filter.py;
UI layer: gui.py + matrix_demo.py + scan_panel.py - one-click access to everything.
Layering matters because the algorithm layer does not depend on the GUI (it runs on servers and in CI), and the acceleration layer falls back to pure Python when a DLL is missing, so the features always work.
9.2 C++ Acceleration: Hot Paths and How We Know They Are Right#
Python is slow at elementwise loops, and this project has two classic hot paths: deterministic permutation (shuffling up to 16 million positions) and feature extraction (RS/chi-square/entropy statistics per image). Moving them into C++ DLLs gives orders-of-magnitude gains: permutation speedup grows with N (data: experiments/data/bench_permute.csv, reproduce with python experiments/tools/gen_bench.py --only permute; timings are machine-dependent): at 4096^2 (16M positions) Python ~15.6 s -> C++ ~0.24 s (~65x), while the small-N end of the same benchmark peaks around ~240x (65k).
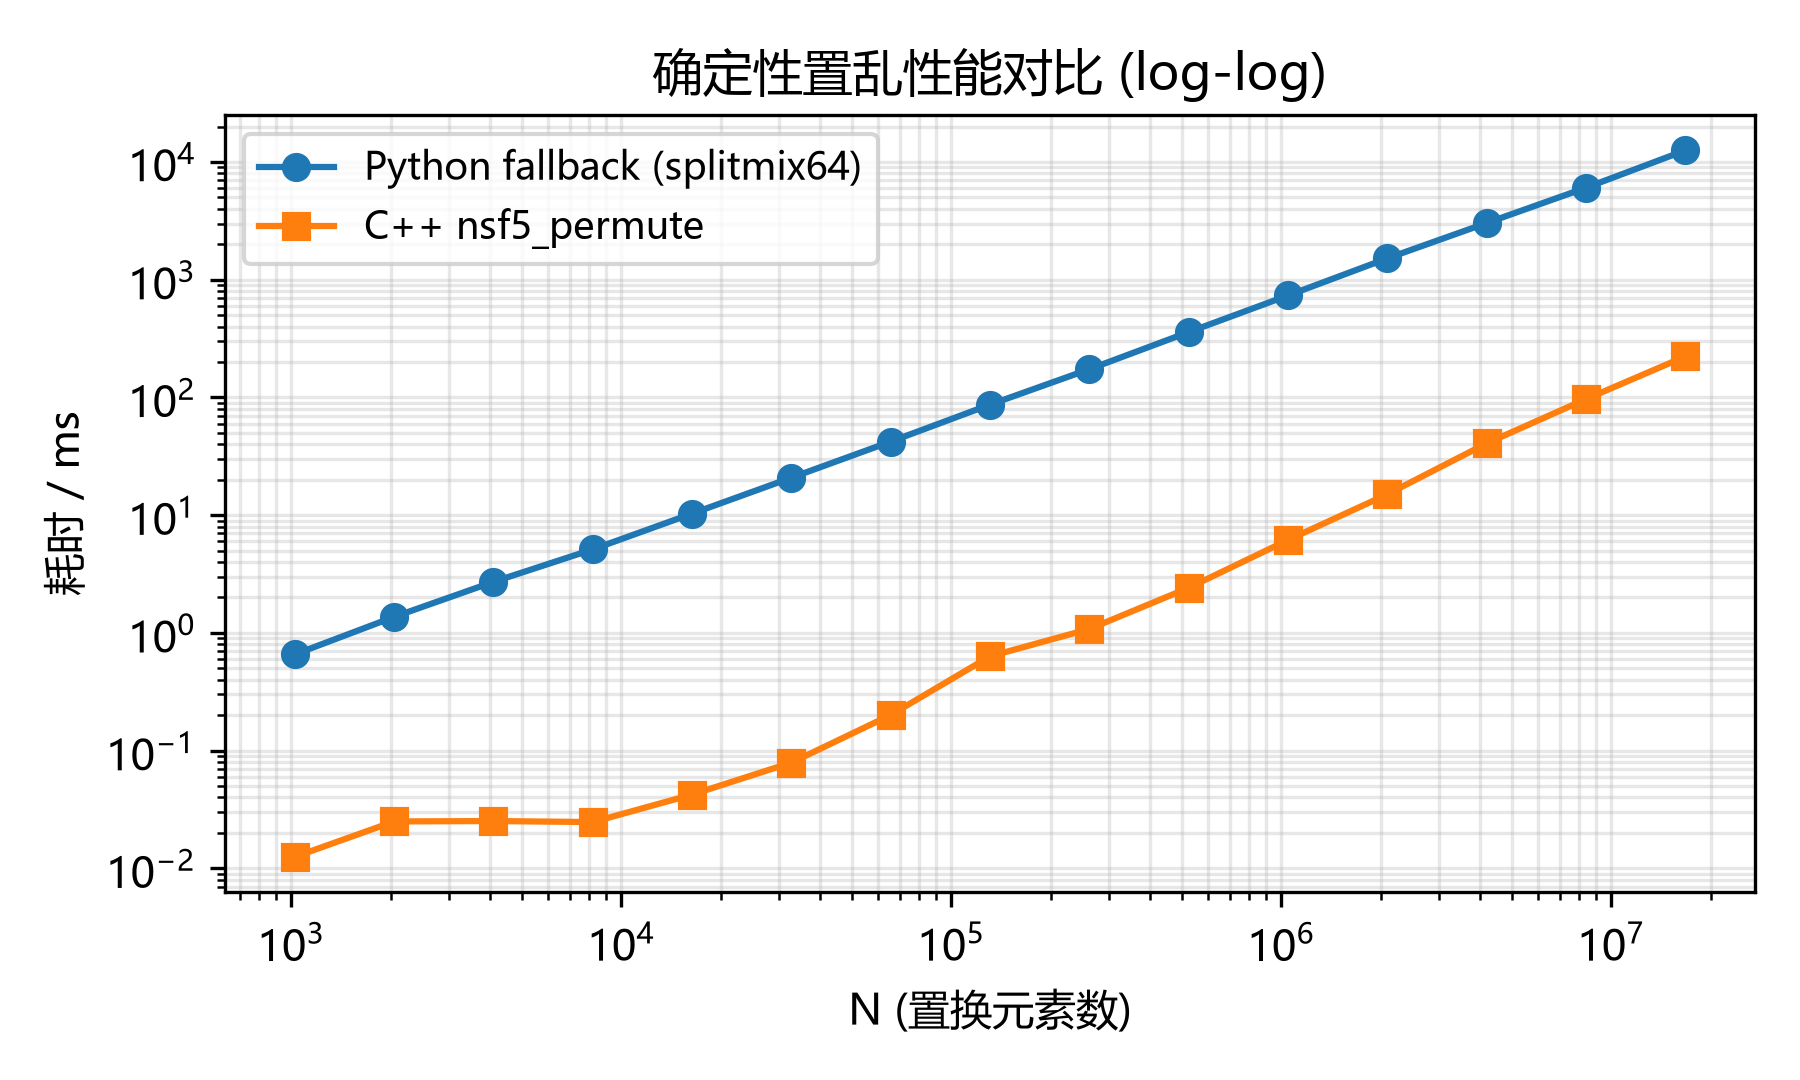
Fig. 9-2 Deterministic permutation: Python vs C++ (log-log axes, project figure)
Speed is worthless unless the result is identical. Python calls the DLLs through ctypes, and the project guards correctness with self-checks:
cppembed.pyembeds the same image through C++ and Python paths and compares outputs pixel by pixel;fsfeatures.pycheck_against_python() compares every C++ feature with the Python reference;When the DLL is missing or fails to load, the code falls back to the same Python algorithm, keeping embed/decode reversible everywhere.
Watch out | Cross-language consistency is the prerequisite for acceleration and a classic debugging minefield: bitwise operations, rounding, and overflow differ between C++ and NumPy. If you ever see “embeds with DLL, cannot decode without it,” run
cppembed.selfcheck()andfsfeatures.check_against_python()before touching the algorithm.
9.3 GPU Version: Batch-Vectorizing Features#
The gpu/ directory rewrites feature computation as PyTorch tensor operators: load a batch of 512x512 grayscale images, compute histograms, RS, chi-square, and entropies in parallel on the GPU, then return results to the CPU. v1.4 adds gpu/featurize_v2_gpu.py for the 143-D v2 features (including SRM convolutions). The v1 pipeline extracts 2,070 images in about 5 seconds (~410 images/s) and matches the CPU reference bit-for-bit (float error ~1e-7).
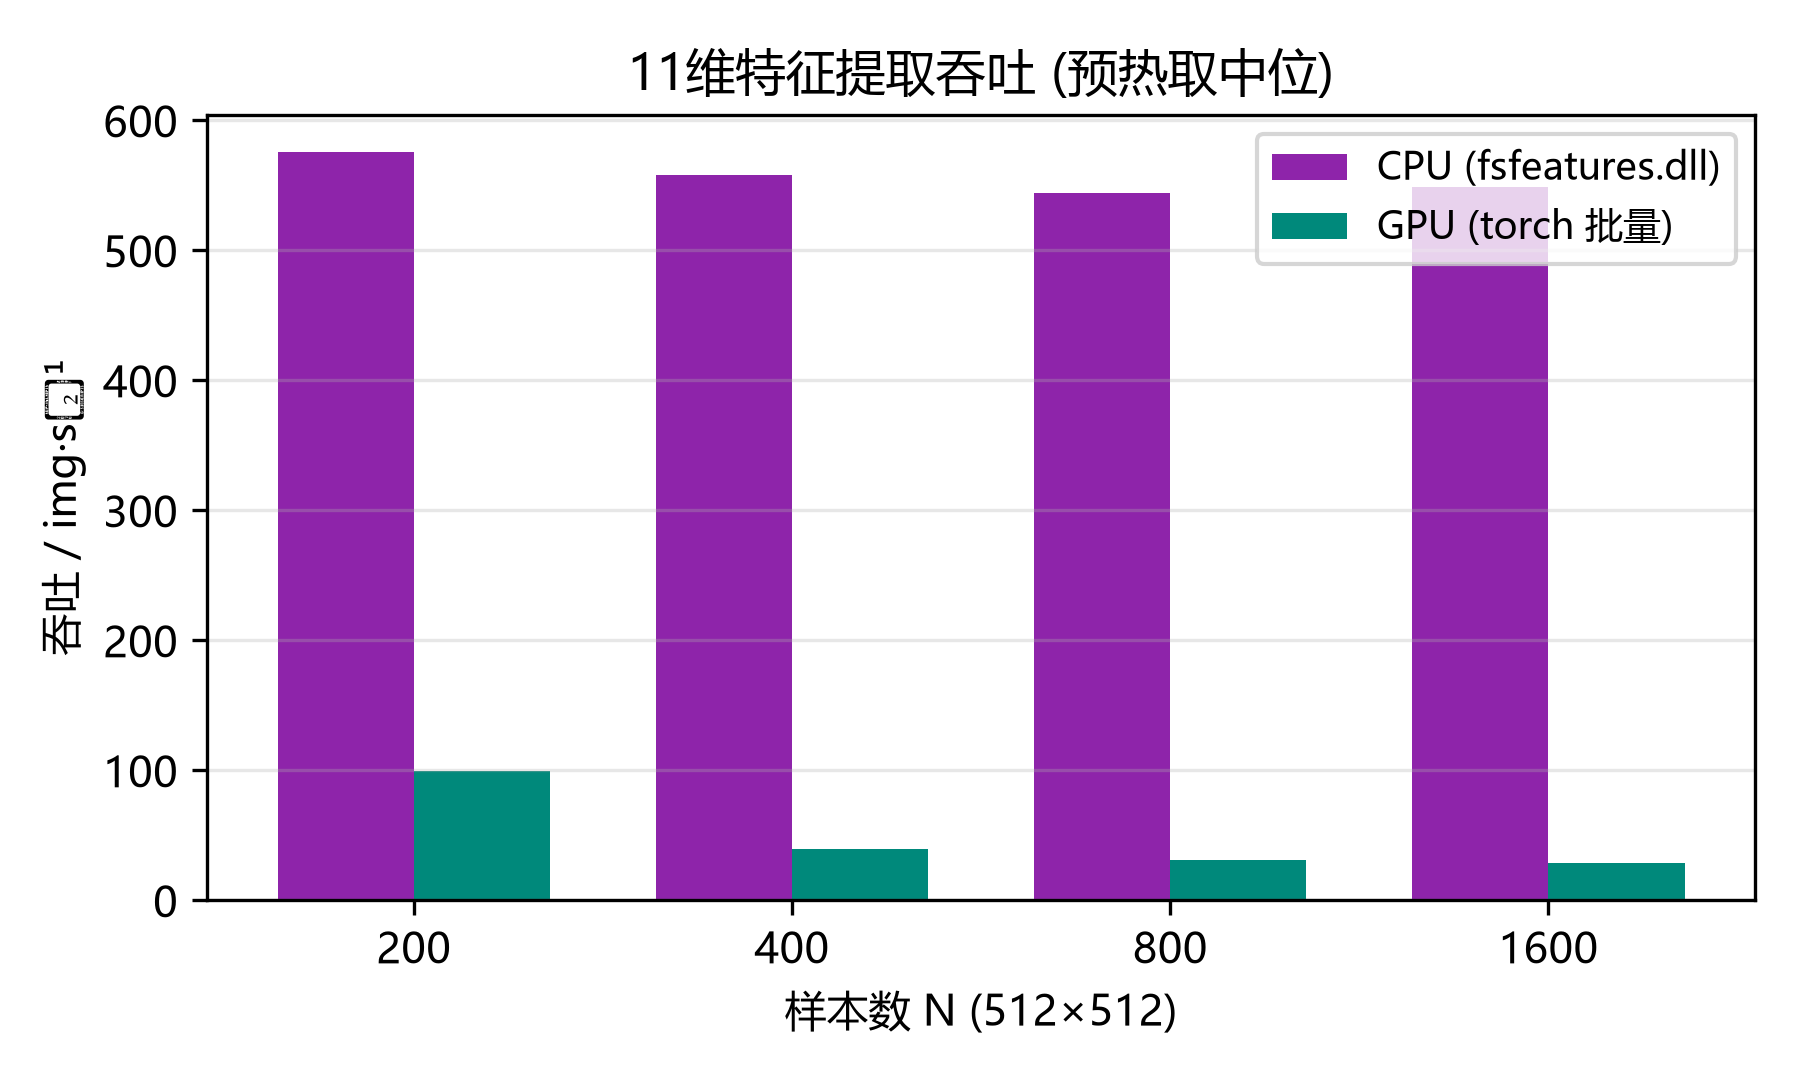
Fig. 9-3 v1 11-D feature throughput: CPU (C++) vs GPU (torch batch) (project figure)
Read the code | Read the self-check in
gpu/featurize_gpu.py: it compares GPU results element by element withsrc/fsfeatures.py. Bit-level consistency is what makes the dual implementation safe. Then read the README discussion of throughput limits: for small batches, host-device transfer can make GPU slower than C++ - an honest measurement, not a marketing claim.
9.4 GUI: Turning a Research Tool into a Teaching Application#
src/gui.py is organized around Embed -> Decode -> Analyze. Two teaching panels stand out:
Matrix coding demo (matrix_demo.py): click a block, watch s, m, and d update live, see the matched H column highlighted, and verify H*x’ = m after the flip;
Payload scan (scan_panel.py): drag payload from 0 to 0.4 and watch chi-square p, RS estimate, and ML probability curves refresh as the image is re-embedded at each density.
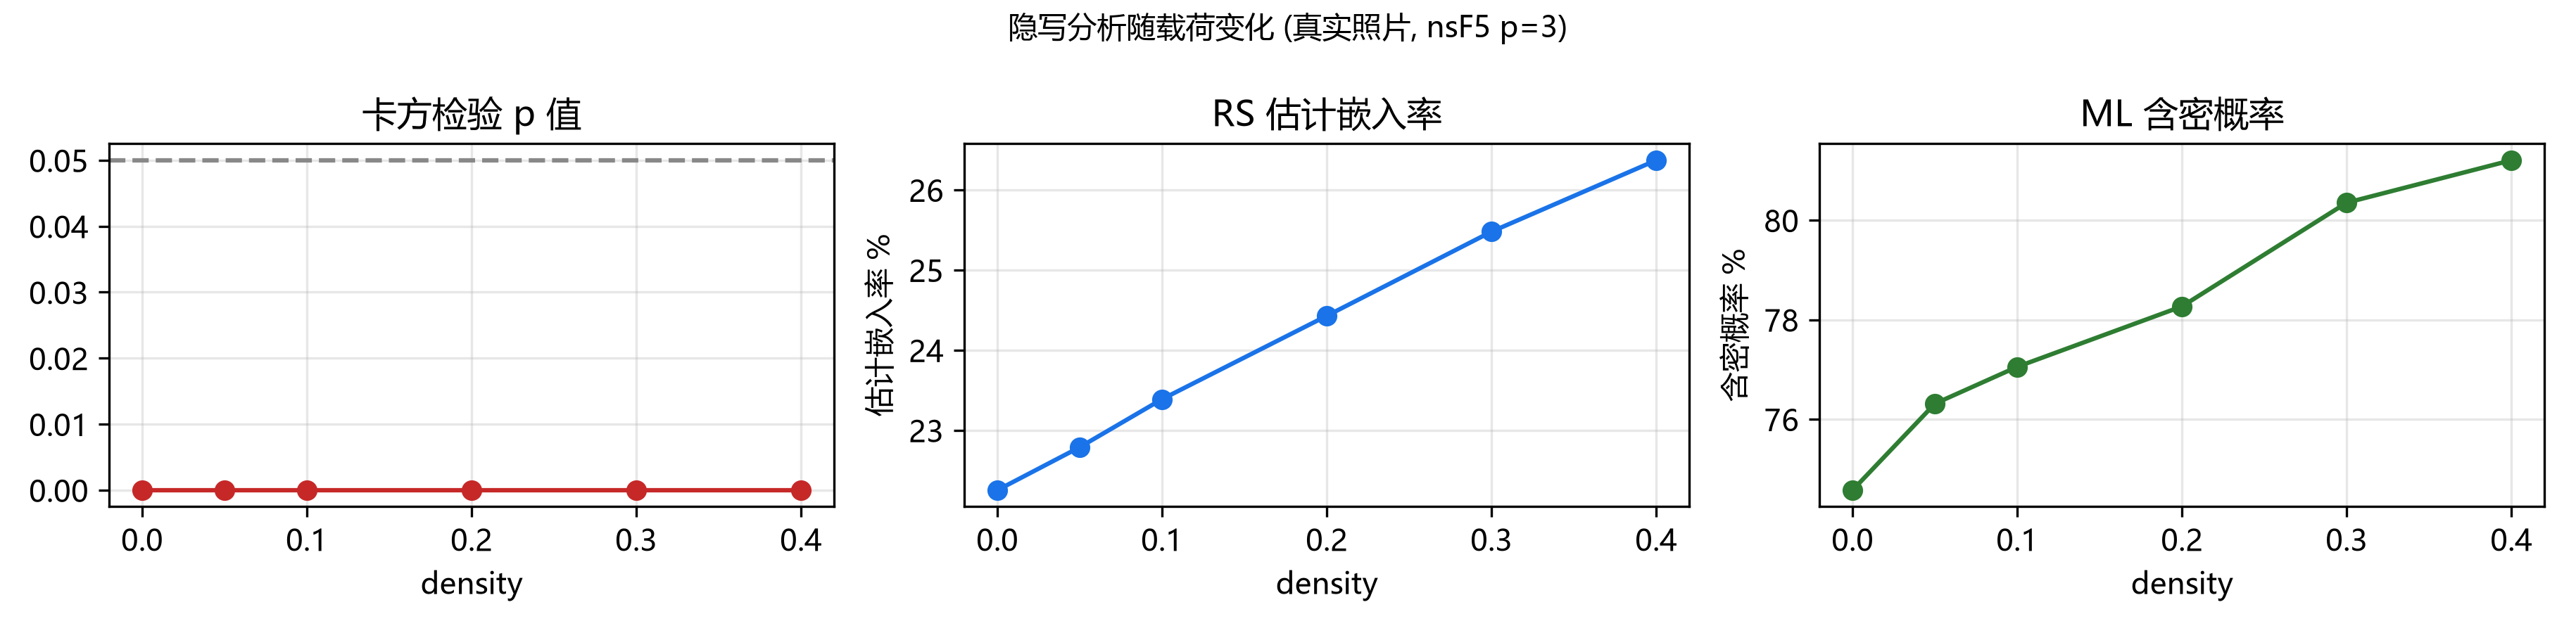
Fig. 9-4 Payload scan: detectability grows with embedding density (project figure)
Watch out | Note the wording in the GUI: a single image has no true “AUC” (AUC needs a set of positive and negative samples), so the scan panel plots model probability as a trend illustration. Distinguish “single-image probability” from “dataset metrics” whenever you read software output.
9.5 Tests and CI: Refactor Without Regret#
Test file |
Verifies |
Mental model |
|---|---|---|
test_core.py |
Hamming matrices, embed/decode round trips, wet paper, wrong passwords |
Algorithms still work |
test_steg.py |
Blind analysis separates clean from stego |
Analysis still works |
test_false_positive.py |
Clean images are not flagged (regression) |
False positives stay controlled |
test_gui.py |
Window builds, loads images, previews |
UI still works |
.github/workflows/ci.yml runs core tests and builds wheel + sdist on every push/PR to main; pushing a v* tag creates a GitHub Release. Tests + packaging + auto-release is the standard way an algorithm project becomes a reusable tool.
9.6 A Code-Reading Route (Use as Needed)#
Entry point: src/run_e2e.py - the shortest path through every module;
Data layer: image_io.py - how arrays enter and leave;
Embedding layer: read ns5_core.py top to bottom (hash, shuffle, Hamming, wet paper, high-level API);
Analysis layer: trace analyze() in steganalysis.py backwards through each statistic;
ML layer: train_model.py main flow -> featurize_v2.py / srm_filter.py (v1.4) -> ml_predict.py dual-model inference;
Acceleration layer: cppembed.py / fsfeatures.py ctypes bindings and self-checks;
UI layer: find a button callback in gui.py and follow it to the algorithm function.
Think about it | Why does the comment in ns5_core.py insist that changing the permutation algorithm breaks reversibility? Combine with the v1.2.1 fix (automatic Python fallback): what catastrophe happens if Python and C++ permutations differ?
9.7 v1.4.0 Update: SRM, Multi-Source Data, and Model Engineering (2026-09)#
Several engineering modules changed in v1.4.0. Learn the new directory first:
New file / module |
Role |
What to study |
|---|---|---|
src/srm_filter.py |
30 standard SRM high-pass kernels; numpy/torch dual implementations |
Kernel list, normalization, enhanced-image pipeline |
src/featurize_v2.py |
143-D v2 feature assembly on CPU |
ALL_FEATURE_NAMES, featurize_v2() |
gpu/featurize_v2_gpu.py |
GPU batch 143-D features and consistency self-check |
extract_features_v2_gpu() |
src/make_dataset.py extensions |
Multiprocessing -j, SRM/feature-set/variants options |
Per-image parallelism, identical row output |
src/train_model.py extensions |
DS_FILES multi-dataset, stacking, LGB tuning |
Dual-model saving and thresholds |
gpu/make_imageset.py extensions |
memmap disk write, –out/–id-offset |
Multi-source partitioning without OOM |
On the data side, v1.4 established a pure campus-photo baseline data/campus_jpg (414 photos; earlier DIP4E textbook images were removed) and added the standard steganalysis benchmark BOSSbase 1.01 (10,000 512x512 grayscale PGM images) for multi-source training. CPU merged training used 72,898 samples (held-out AUC ~0.741); GPU merged training used 52,070 samples (validation AUC ~0.712); BOSSbase alone reached only ~0.644 on GPU - a harder benchmark with weaker signals. make_dataset.py now parallelizes across images (~5.6x speedup on 16 cores), and GPU image sets use memmap writes to avoid OOM.
Tooling changed too: the license moved from MIT to Apache-2.0 with a NOTICE file and third-party attributions, and README/pyproject now declare v1.4.0. The pixel-level and feature-level self-checks between C++ and Python remain in place.
Try it | Run
python gpu\featurize_v2_gpu.pyself-check. Then follow the README to generate one source fromdata\campus_jpgand one fromdata\BOSSbase_1.01, and compare three models: campus only, BOSSbase only, and merged. That is the most instructive data-domain experiment in v1.4.